Now that everything has been prepped, it's time to apply a coating of the bonding agent with a clean cloth. This coat will need to dry about five minutes before you're ready to move on. Open the window and put on your mask. If you don't have a window, put on a respirator. You're ready to spray on your first coat of primer.
In addition, an old cast iron/porcelain tub weighs about 200 lbs and even the pieces are heavy -- yes, those broken ends are sharp. It's a lot of heavy work and requires some knowledge. After the demolition, the old tub pieces have to be taken to a landfill. At the end, the new replace shower with soaking tub may cost less than $300.00, but with all the tear-out and payments to a plumber, tile setter and disposal fees, tub replacement can cost up to $1500.00. The project may last a week or more.
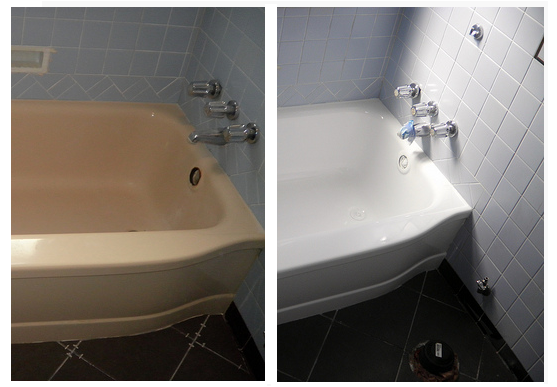
The traditional way to resurface a bathtub is to sand it down, and apply a brand new coat and finish. You can hire someone to do it reglazing tub or you can do it yourself.
If you enjoy your work you'll never work a day in your life. I remember looking forward to Monday mornings sitting in Sunday school before church. I could hardly wait to get started on Monday morning on that new project I just got a down payment on.
Changing your cabinets can be the most expensive part of remodeling your kitchen. When I wasn't able to change my cabinets I decided to do refacing or refinishing. If your cabinets are in good condition then you can make a huge difference by refacing. It was surprisingly cheap and I changed my cabinets from a light color wood to very dark. Everyone who came to my kitchen thought I had gotten new cabinets. I did this work on my own which helped me save bath tub restoration the money on labor.
The next step in the process is to sand down the surface of your tub in order to rough it up a bit and make the surface even. This will make it easier for the paint to cling to the surface. At this point you should also cover up any surfaces that you do not wish to paint with masking tape.
It is recommended that you get the aid of a professional in doing this so that it would work out properly. The bright, new finish of your tub can last for a decade or two but most of the refinishing companies only offer five-year warranties.